Recessed lights are ceiling lights which are tiny in size and the housing sits inside the ceiling while they provide unobtrusive ambient light in any interior. These fixtures technically have a very minimalistic touch to them, yet their installation is, in fact, technical. Despite being smaller and very subtle lights they are available in a variety of designs. The variation relies on housing and trim designs which you can select from here.
In order to install LED recessed lights in your home, here are a few things to consider:
Plan Ahead
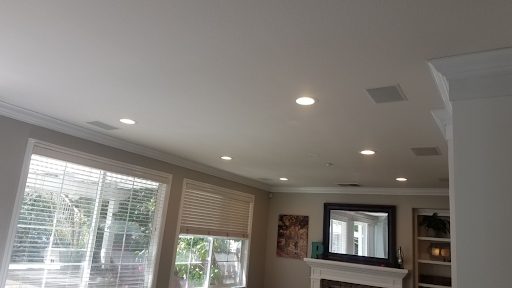
Recessed lights can create any unconventional lighting layout as you can easily direct the light from the fixture without obstructing the room’s general design.
The tiny fixture has essential functional components, which are: housing, bulb and trim. These three components determine the fate of the fixture.
Determine the type of lighting you want
There are various lighting layouts which can be created depending on the layout of the room be it kitchen, bedroom, living room, washroom. To create a general lighting layout, determine:
- Height of the ceiling
- Size of the fixture
- Placement of the fixtures
- Number of the fixtures
All 4 of these factors are interlinked as for low ceiling areas, smaller fixtures of sizes 2-4 inches are compatible, and the distance between each fixture is based on the size of the fixture. For example, each 4-inch fixture is placed 4 feet apart from each other.
For accent and task lighting layout, select the zone of the room you want to dedicate as a task space or for furnishing. According to that area, choose the size and trim of the fixture to create the desired lighting effect.
2. Check the ceiling type

Most of the old homes are not equipped with the ceiling design required for the best efficacy of recessed lighting. If the ceiling has extra space above the ceiling, it works as insulation, so insulation contact housing is appropriate for such a ceiling type.
Likewise, there are different recessed lights housing for other ceiling types, which are:
- Remodelled housing:
For refurbished homes and older ceiling designs, they are appropriate in spaces where there is less overhead space and it makes the place look bigger.
- New construction housing:
New construction housing has place already allocated in ceiling design while construction for recessed lights.
- Non- Insulation contact:
This housing is selected for ceilings which do not have a proper insulation system.
- Insulation contact housing:
This housing is installed by in contact with the insulation above the ceiling, it traps heat above and keep the fixture cool.
- Sloped ceiling housing:
For period homes or vintage design ceilings, in eccentric ceiling or architecture designs this type of housing is appropriate for installation.
- Airtight housing:
This type of housing is to trap any flow of air between fixture and ceiling and usually installed in non-insulated ceiling designs.
- Line voltage:
Recessed lights installed for general illumination are usually installed on same line voltage as the rest of the house. There is a specific kind of housing for this.
- Altered voltage housing:
This housing supports accent or task lighting different voltage is used which is lesser than rest of the house for ambience and accenting.
3. Check the wiring
If the existing wiring is of the same material, i.e. aluminum, and has a ground wire link, then the installation is set to proceed as recessed light fixtures require a bare(ground) precautionary wire measure.
If not, then get technical assistance for the installation of ground wire for the fixtures.
Line voltage or altered voltage system
Recessed light fixtures for general lighting can operate directly off-line voltage, so bulb wattage per fixture is determined.
Altered voltage system is for recessed light fixtures for accent lighting and task lighting as they operate on low voltage and create contrast lighting.
How to install:
Once everything is in order, and a layout is set, these are the steps to follow for proper installation:
- Turn off the electric supply at the main fuse box, which supplies the power to the fixture.
- For remodelled ceilings, drill a hole in the ceiling at the center of the opening. Check if there’s space above the top by using fish tape to check for obstructions.
- Using a light pencil, measure the area needed to be cut for the hole where housing will go, then, using a hole saw, cut through the measurement to make the opening for the fixture’s housing.
- Pull the cable from the power source out of that opening. Repeat the same procedure for all fixtures.
- Identify the wires with the help of colour coding. (black, white, and bare wire)
- Wire the first light to the power source by linking the black wire with black wire from fixture, white wire with white fixture wire and ground wire with fixture’s ground wire. Cap them with a tightening screw or connectors.
- Repeat the same procedure with all fixtures.
- Insert the housing in the ceiling, clamp it shut.
- Install the trim. The trim flushes with the ceiling and is the outermost decorative part of the fixture which also directs the light out of the fixture in your desired direction for desired lighting effect.
- Switch on the power supply to check if the fixture is working correctly.
Conclusion:
This is a short guide on installing LED recessed lights in your home; with essential knowledge, you can most definitely design a layout and install them with ease. Although the technicalities must not be overlooked as there’s a chance of accidents or improper installation which will lead to malfunctioning of the fixture. To avoid that of course, it’s always an advantage if you seek technical assistance to ensure proper installation or guidance because despite high initial installation costs they are convenient as they reduce electricity bills and LEDs have a superior life span of more than 10000 hours which is easily 2-3 years and they do not reduce their efficient function during their lifetime.
 Hi Boox Popular Magazine 2024
